
Product Details
Knitted Socks East and West: 30 Designs Inspired by Japanese Stitch Patterns
Free Shipping+Easy returns

Product Details
Vintage Crochet PATTERN to make – Easter Egg Covers Bunny Chicken. NOT a finished item. This is a pattern and/or instructions to make the item only.
Free Shipping+Easy returns

Product Details
IPOW Flower Floral Canvas Cosmetic Pen Pencil Stationery Pouch Bag Case, Pastoral, Set of 4
Free Shipping+Easy returns

Product Details
Handmade Yarn Necklace Scarf Crochet Fabric Adjustable Times Up Black Silver
Free Shipping+Easy returns

Product Details
JR.WHITE Mermaid Tail Blanket for Kids,Hand Crochet Snuggle Mermaid,All Seasons Seatail Sleeping Bag Blanket (Green White)
Free Shipping+Easy returns

Product Details
LA Active Knee High Grip Socks – 5 Pairs – Baby Toddler Infant Kids Non Slip/Skid Cotton
Free Shipping+Easy returns

Product Details
UETECH Wrinkle Free Round Tablecloths Easter Decorations Greenish Yellow Gray White Diameter 50"
Free Shipping+Easy returns
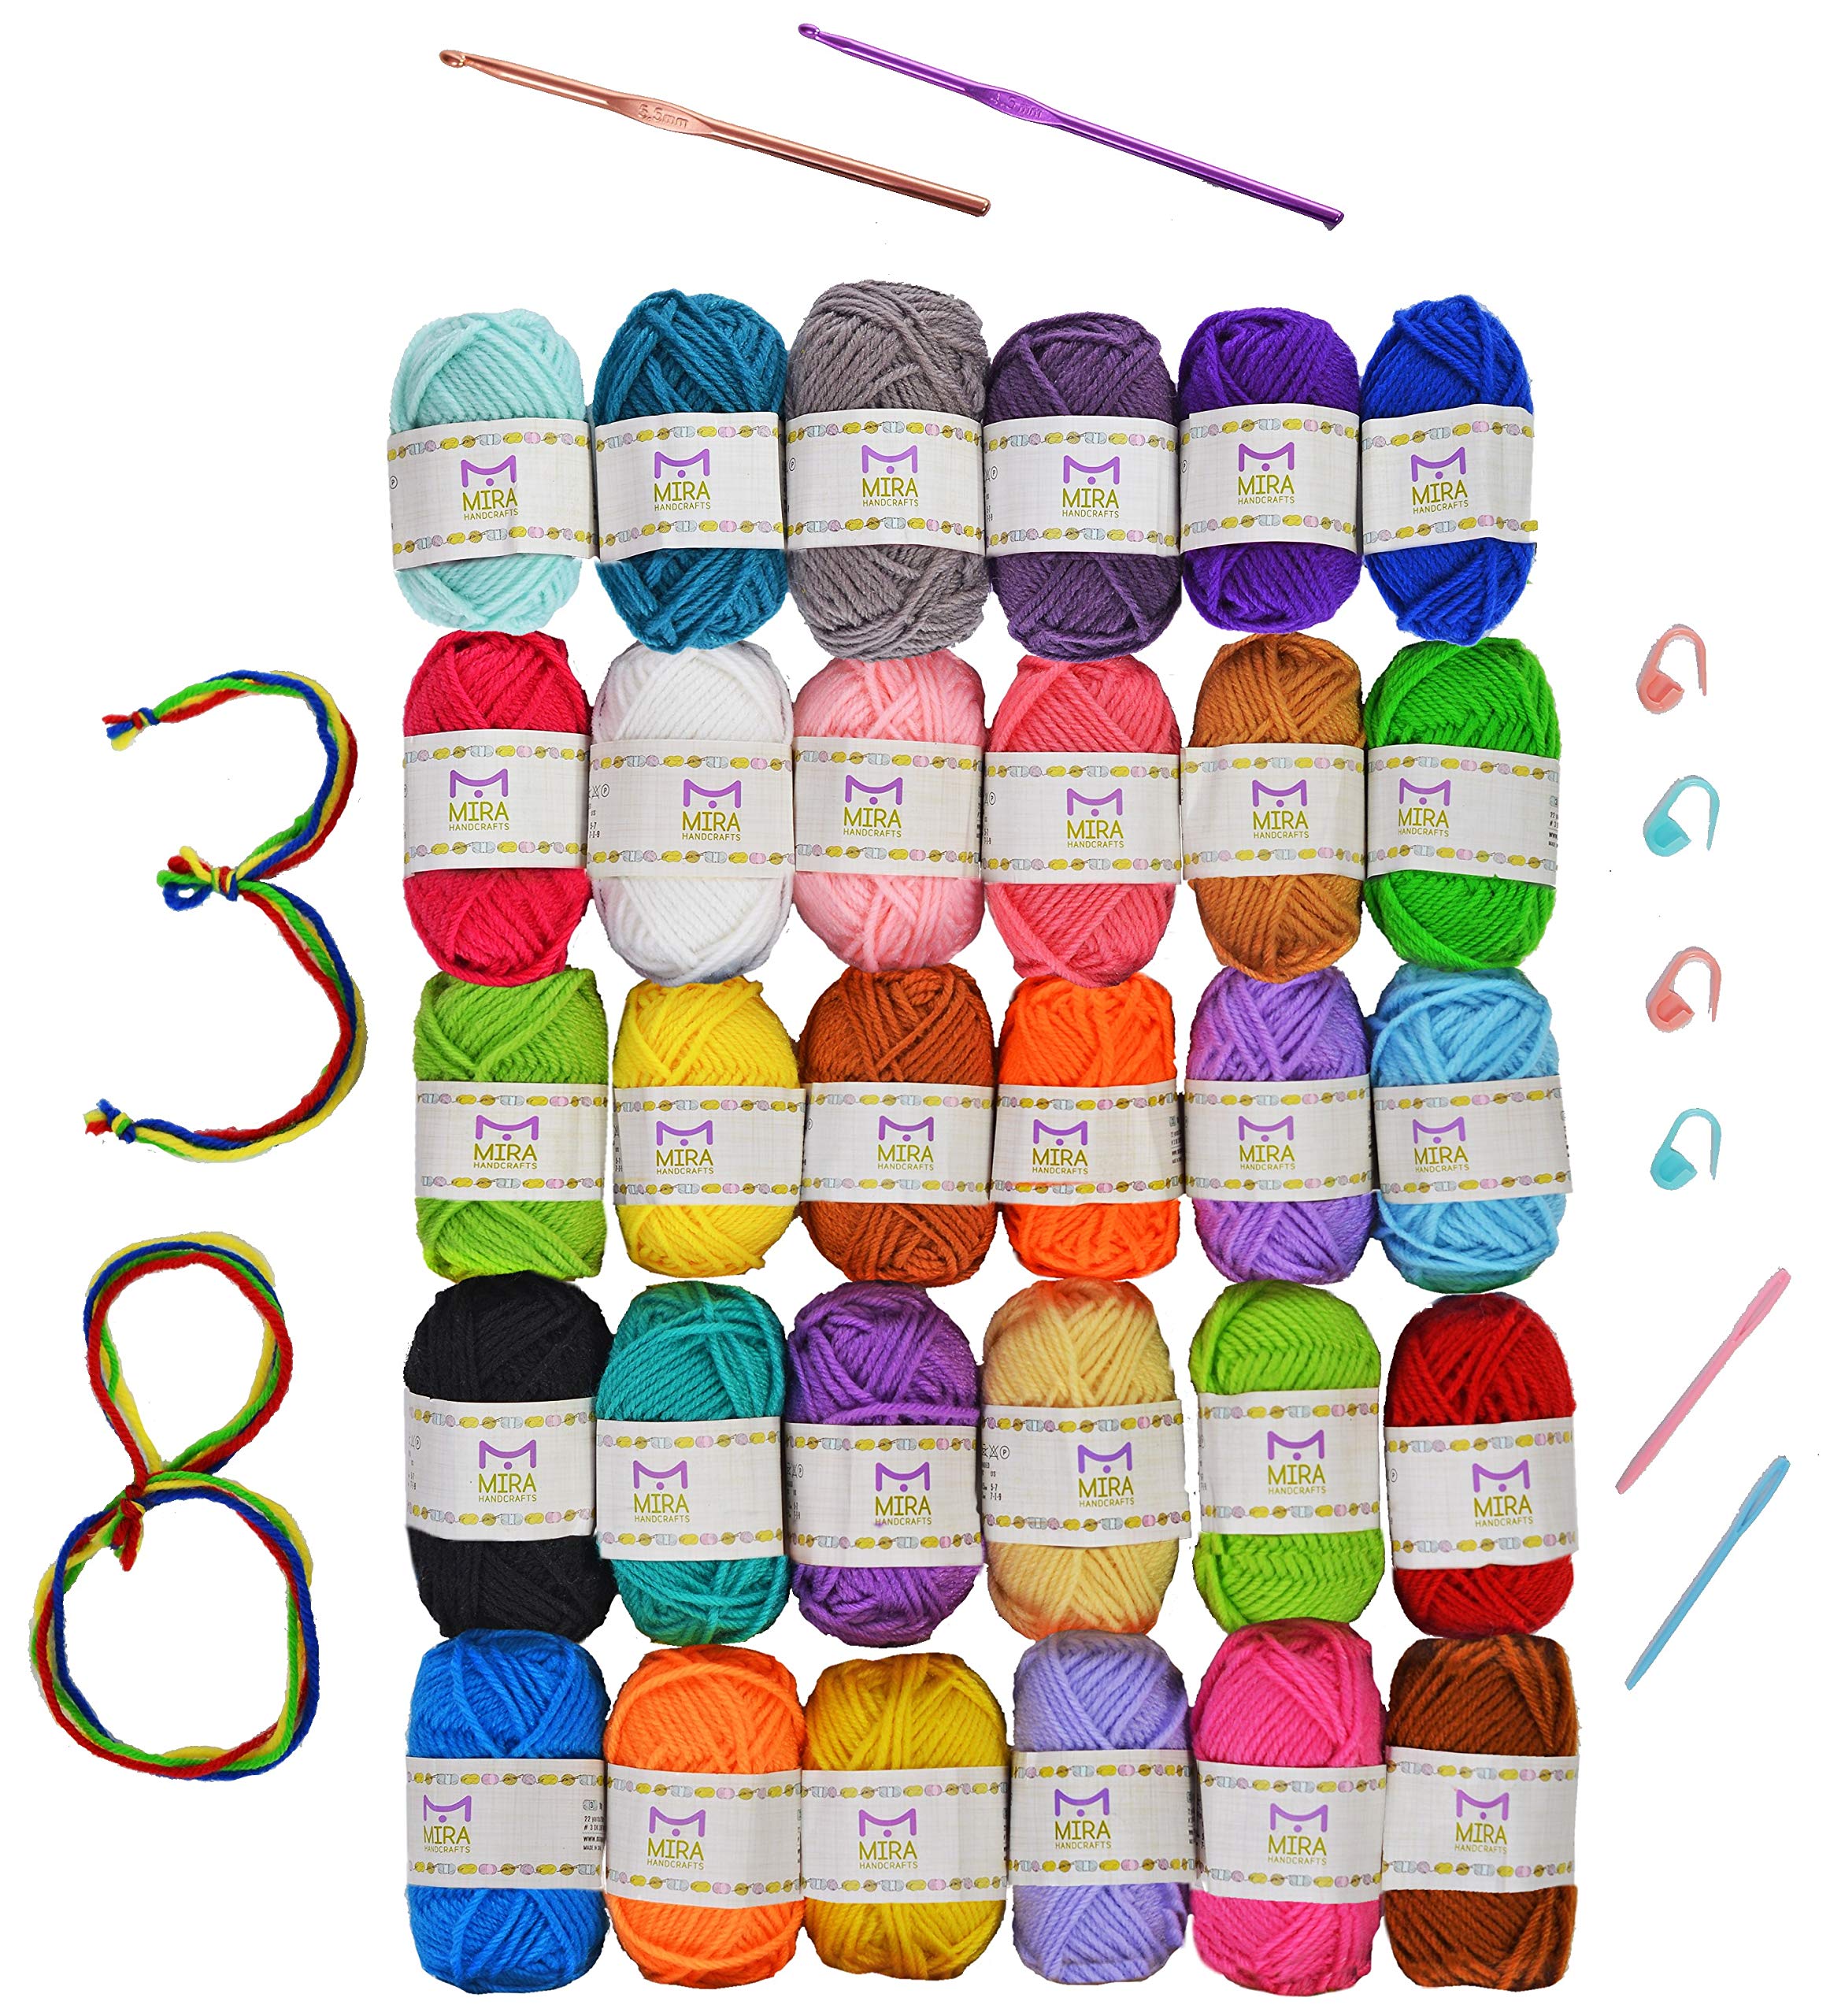
Product Details
Mira Handcrafts 30 Acrylic Yarns – DK Yarn for Crochet and Knitting – 2 Crochet Hooks, 2 Plastic Needles, 4 Stich Markers, 7 Ebooks with Yarn Patterns Included – Perfect Craft Yarn
Free Shipping+Easy returns

Product Details
Zara Henry Design USA Jacquard Square Tablecloth,Traditional Easter Eggs Print Wrinkle Free Tablecloths, W36 x L36 Inch
Free Shipping+Easy returns
crochet

If you are looking for some Free Easter Crochet Patterns you are in the right place. We’ve included Easter Crochet Baskets and more. Check them out now.
Crocheting

Mini Easter Treat Basket Free Crochet Patterns
Easter

Easter Crochet Patterns 16 Free Crochet Patterns For Easter Easter Pinterest Easter. Easter Crochet Patterns 16 Free Crochet Patterns For Easter Daisy Cottage Designs. Easter Crochet Patterns Hop Into 7 Free Easter Crochet Patterns Allfreecrochet. Easter Crochet Patterns 16 Free Crochet Patterns For Easter Daisy Cottage Designs. Easter Crochet Patterns 16 Free Crochet Patterns For…
#FreeCrochetPatterns

Here we have rounded up some of the best spring time free crochet patterns from home décor to wearing accessories. From sun hats to purses and so more..
Häkeln

This DIY crochet Easter bunny garland is an easy and cute Easter craft! And a great way to use up yarn scraps!
EASTER Crochet – Crafts

Crochet Easter Egg Cozy Cover & Holder Free Patterns: Crochet Easter Egg Cozy, Holder, Hat, Tray Free Patterns, Easy and fun Easter Crochet Projects
Crochet for kids and teens Patterns

I am so ready for Spring to be here and with Easter around the corner, these headbands are perfect for both! These work up fast (I feel I say that on EVERY pattern I make, but that is probably because I like patterns that I can have done fairly quickly). It’s my go to! To make a bunny headband you will need a 1-inch wide headband (don’t worry if you have a wider or narrower one, we can adjust). I found the ones I used at Walmart in the girls’ department, they came in a 6-pack for only $3! The best thing about this headband is that it uses hardly any yarn and is a great way to work through your scrap stash. This would be a sweet gift or item at a craft fair and pairs well with the Berry Patch Bunny! If you’d like to stay up to date on new patterns as they’re released sign up for our newsletter here! Be sure to also join the Grace and Yarn Crochet Group on Facebook! It’s a growing community where you can share your work and ask any questions you may have along the way! Pattern PIN to your crochet board here! An ad-free printable version can be purchased for a small amount in my Etsy or Ravelry shop. You may make and sell items made from this pattern but please do not sell, share or reproduce the actual pattern. If you sell finished items online (Etsy, etc) please provide a link to the pattern and credit to me as the designer. Thank you! This post contains affiliate links, please click here for more info. Thank you for supporting Grace and Yarn! Materials- Worsted weight (size 4) yarn in color of your choice for the bunny and flowers 3.5 mm and 5.00 mm crochet hook (these are my favorite brand of hooks!) Scissors Tapestry needle Headband- I used a 1-inch wide headband (I will give instructions on how to alter if you have a different size on hand) US Abbreviations- MC- Magic circle SC- Single crochet SC INC- SC increase INV DEC- Invisible decrease DC- Double crochet Sl st- Slip stitch Let’s hop to it! Headband- With 3.5 mm hook To start the headband make a magic circle with 10 SC, pull tight to close. You will want to tie a knot to secure your magic circle, this will prevent it from coming open once the headband is placed inside. We will be working in a continuous round without joining. Rounds 1-70: SC around (10 SC) We are making a tube to insert the headband into. If you have a wider or narrower headband adjust the number of SC in the magic circle accordingly. Example, if your headband is wider try 12 SC, if your headband in narrower try 8 SC. We all crochet with a different tension, while my tube needed to be 70 rows to cover my headband yours may need less or more. Feel free to test it out from time to time to see how it fits! When your tube is long enough insert your headband and sew closed. This is very similar to closing a hat or amigurumi. Weave your tapestry needle in and out of the stitches until you reach where you started, pull tight to close the circle and secure. Ears- Make 2 With 3.5 mm hook Round 1: Make a magic circle with 8 SC Round 2: SC around (8 SC) Round 3: SC in the first stitch and SC INC in the next, repeat around (12 SC) Rounds 4-6: SC around (12 SC) Round 7: SC in the first 2 stitches, SC INC in the next, repeat around (16 SC) Round 8: SC around (16 SC) Round 9: SC in the first 3 stitches, SC INC in the next, repeat around (20 SC) Rounds 10-21 SC around (20 SC) Fold your ear in half and SC across the top (this will help keep the ears from flopping forward or backward) Sew both ears onto the headband evenly apart as pictured below. Use the SC across the top to sew through on each side. I also sewed up into the ear and back down twice on each side of each ear, keeping the sti
tch on the inside so it’s not noticeable. The roses for this headband are from my Easy Crochet Rose Tutorial (which comes as a right and left handed tutorial). We will be using the small rose. Small Rose- Make 3 With 5.00 mm hook Chain 24 Row 1: DC in the 2nd chain from hook, ch 1, DC in the same chain, ch 1, skip the next chain, *V-stitch in the next chain, ch 1, and skip the next chain* Repeat this through to the end of the chain, ending with a V-stitch. You will have 12 V-stitches and 11 chain 1 spaces in-between Row 2: Chain 1 and turn, complete 5 DCs in the first V-stitch (this is your first petal), slip stitch into the chain 1 space, *repeat 5 DCs in the V-stitches and slip stitch into the chain 1 spaces for a total of 5 petals, complete the next 5 petals with 4 DCs each and slip stitch in between, the last 2 petals with have 3 DCs in each Fasten off leaving a long tail to sew it together Starting with the side having the long tail, start to roll your petals together into a circle as pictured below, with your needle push through the first petal to the bottom of the flower. Then sew through each layer back and forth to secure each of the petals in place, fasten off Your small rose is done, now you only need 2 more! Sew your flowers onto the headband. I started with the middle and aligned the others right next to it on either side. Whew! We’re done! I hope you and your little one(s) enjoy this fun Spring headband as much as I did! Feel free to share pictures with us on Facebook, we’d love to see them! Thank you for visiting, Stephanie


